Showing posts with label harvest. Show all posts

Thursday 18 May 2023

This Year's Pumpkin Harvest

Hello friends,

Every year I make an effort to grow as many pumpkins as I can—not only for ourselves, but also for family and friends too. We're typically not big pumpkin eaters, well except for pumpkin soup. We make it up in bulk when all the ingredients for the recipe have been harvested, and include our own homegrown potatoes, onions, and garlic. Once made, we freeze our pumpkin soup away in meal-sized portions, and eat it all through autumn and winter for lunches since hubby and I both work from home.

Back in September 2022, I decided to sow baby bear and also grey crown varieties of pumpkin seeds for the upcoming growing season. The first sowing didn't germinate thanks to some dodgy seed raising mix, so I had to resow the pumpkin seeds in early October. This time all the seedlings germinated and grew up into healthy plants. In Labour weekend in October they were planted into one of our large garden beds along with corn and wheat.

Pumpkin vines with growing pumpkins in a garden bed.
This past growing season had the hottest and driest weather for us in Dunedin in many years. The pumpkin plants grew very quickly, and before Christmas had even come, the plants had already started producing fruit.

A gray crown pumpkin growing in a garden bed.
The summer months of January and February were hot and dry, and it wasn't long before the pumpkins began changing colour. I was watering the plants as often I could, but by this time our neighbourhood was under strict water restrictions.

Ripe Baby Bear pumpkins growing in a vege garden bed. 
In early March the pumpkin plants started dying back, and finally we had some decent rain again. It was now time for the pumpkin harvest. It was our biggest pumpkin harvest ever. Our 6 grey crown pumpkins weighed a combined total of 18 kg, and our 11 Baby Bear pumpkins came in at a combined total of 7 kg.
Our Baby Bear and Gray Crown pumpkin harvest.
After setting aside pumpkins for our own use, and also for family and friends, we had 6 pumpkins left over. Luckily our neighbourhood has a very active fruit and vege produce swap group. I posted my pumpkins up on their Facebook page, and within minutes all my spare pumpkins were taken by people wanting to swap produce.
Pumpkins to be given to our local produce swap group.

I was very soon inundated with lots of wonderful fruit we don't grow in our own fruit and vegetable garden, and in return I made new friends who left quite happily with a pumpkin or two.

One of our big gray pumpkins got given to an online friend in return for a box of quinces, and you can find the story in one of my previous blog posts, here.

A box of quinces.
I hope to share with you soon, my other adventures in processing and eating my autumnal fruit bounty.

Have a wonderful day

Julie-Ann

Monday 3 April 2023

Our Poached Quince Recipe

Hello friends,

Today I thought I'd share our poached quince recipe with you. It's the perfect autumnal dessert to eat with vanilla ice cream on a cool night. And if you have any poached quince left over, just freeze it away to eat at a later date. Quinces are an acquired taste, just like feijoas, but once you've tried them, their wonderful aromatic taste will stay with you all year, as you impatiently wait for their autumn harvest once again.

The hardest part of the recipe, is probably finding quinces. When we lived in Wellington our local New World stocked them for a few weeks each autumn, so we bought them when we could, and made up a big batch to last us over the year. Now we live back home in Dunedin, it's a bit harder to find quinces, as the local shops don't stock them. Luckily this year, I had an excess of pumpkins, and I swapped a big crown gray pumpkin for a box of quinces with an online friend, but this excess pumpkin harvest swapping adventure is a whole other story.

A box of ripe quinces

For this recipe you'll need:

3 - 4 ripe quinces

750 mL of water

1.5 cups of sugar

1 cinnamon stick

1 vanilla pod (or 1 - 2 star anise if you can't get a vanilla pod)


The recipe:

1.    Peel and core the quinces, chopping off any damaged sections. The fruit are quite brittle and hard, so it's a bit of a job to do. The fruit are unpleasant to eat raw, so I wouldn't advise trying it.

 
2.    Chop the quinces into slices or cubes depending on how you'll want to eat them. The  fruit will start to oxidise quickly (turn brownish), but don't worry about that, it'll all turn out okay in the end.

Cored and peeled quinces in bowl

3.    To a pot add the water and sugar, mix, and begin to heat to a simmer.
 

4.    Add the quinces to the pot, and add the cinnamon stick and vanilla pod. You can swap out the vanilla pod for star anise if you want, but personally I prefer the vanilla pod.

Quinces and spices in a pot full of sugar and water.
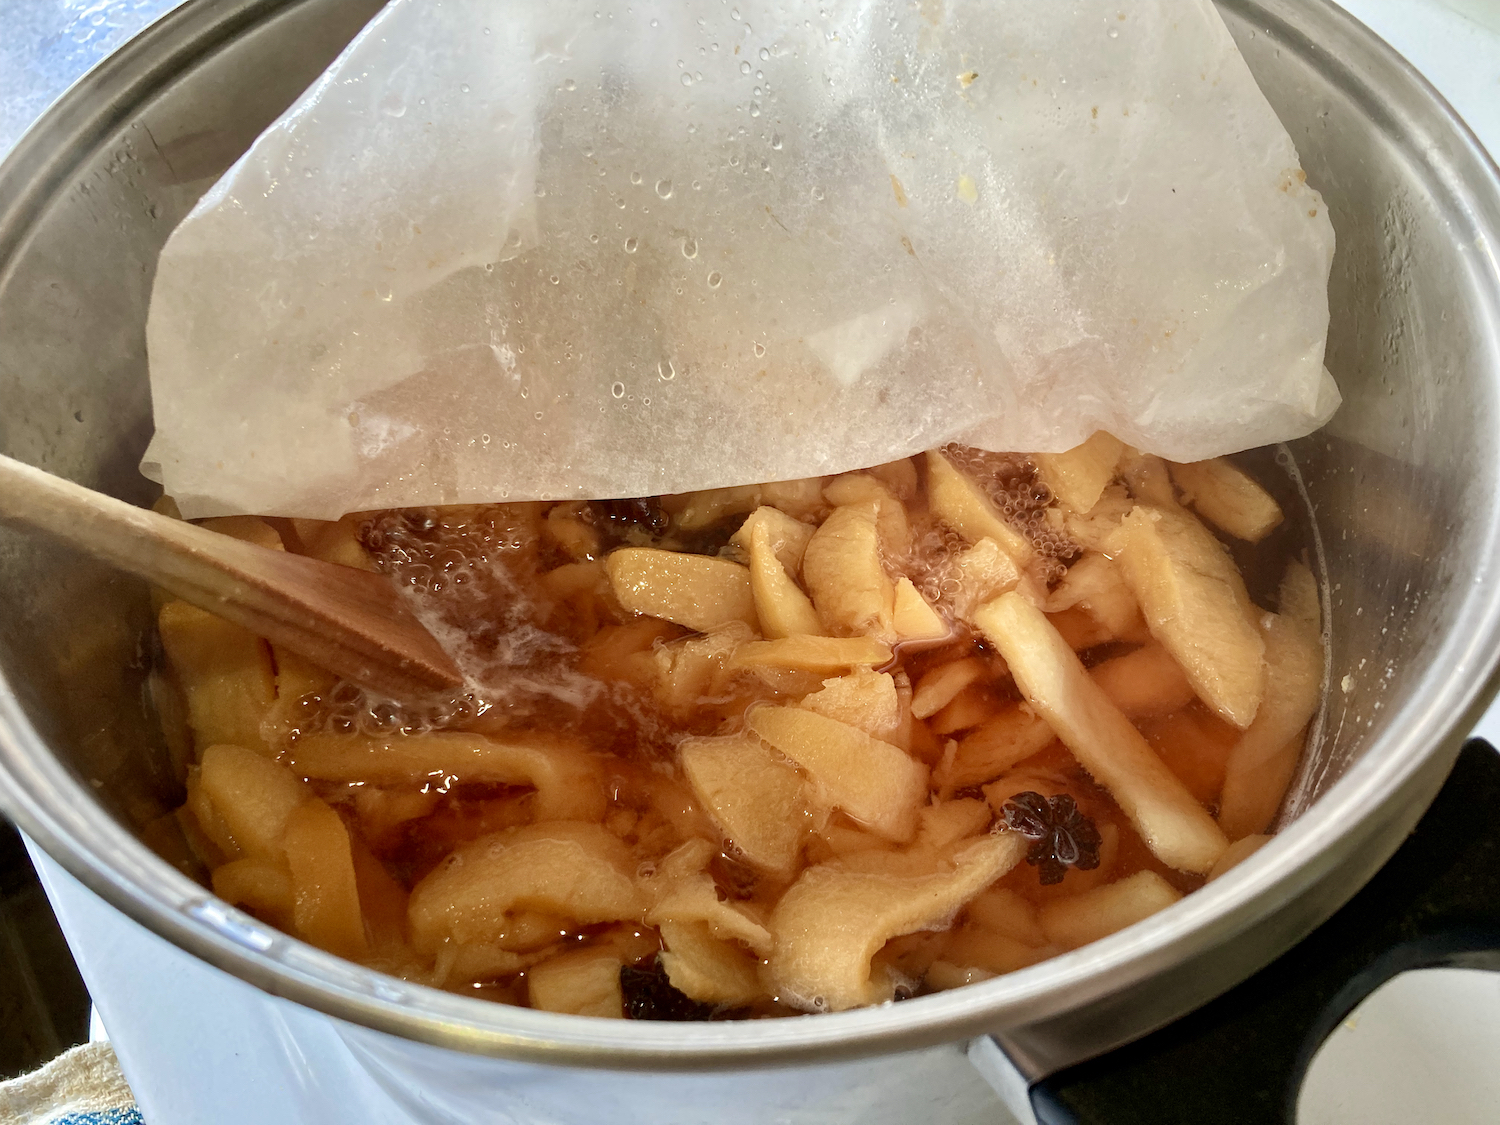
5.    The next thing to do is to make a paper cartouche for the quince mixture. A cartouche is a parchment paper lid, and it covers the surface of the poaching mixture. It traps the steam, and keeps the components submerged in liquid. 

We just cut off a section of grease proof paper, and folded it so it fitted on top of the quince mixture. It is important to mold it to the mixture so it keeps everything wet.

A pot with a paper cartouche covering the quince mixture.

6.    With the lid of the pot off, heat the mixture up, and then let it simmer for an hour.

Over time the quinces will slowly change colour, changing from a creamy yellow, to a dark rose pink.

This is the colour at the 30 minute mark, it hasn't changed to a pink shade yet.

The colour of the quince mixture at the 30 minute mark.
7.     This is the colour at the 60 minute mark. The quinces now are a rose pink, but not quite dark enough. If you do a taste test you'll find them still slightly bitter, but the quinces will be soft like cooked apples.

Quinces at the 60 minute mark.

8.    What you are looking for is a slightly darker shade of rose pink, and the quinces will taste highly aromatic. When you're happy with the flavor and taste, remove the cinnamon stick and vanilla pod (or star anise) from the mixture. Remove the pot from the heat.

9.    The only thing left to do is eat it, storing any left overs in the fridge or freezer. I recommend having it while still warm (or re-heating in the microwave), with some good quality vanilla ice cream. The vanilla ice cream really brings out the aromatic quince flavor.

Poached quince with vanilla ice cream in a bowl.
I hope you get a chance making our poached quince recipe yourself over the autumn season, they really are a wonderful fruit. We currently have a fresh batch stored in the fridge to eat this week, and also a couple of frozen batches stored away for later on in autumn and winter. 

Please let me know if you give this recipe a go, and tell me what you think of it.

Have a wonderful day.

Julie-Ann

Thursday 30 March 2023

Planting Miniature Irises for Spring

Hello friends,

I can't resist a good plant catalogue, well any plant catalogue really. If one shows up in my mailbox with the plants all decked out in bright and colourful flowers, how can I resist buying bulbs in autumn for the coming spring?

Well I can't of course, and especially when they're tempting me with miniature plants. As you will see in spring, for some time I have been adding to my crocus and Tete a Tete daffodil collections. The tinier the plants the better, in my opinion.

Miniature Irises Flowers.

Well this time the Garden Post plant catalogue offered me miniature irises. Teeny tiny irises that would be only 15 cm tall at most, and would be one of the first bulbs to flower in spring. Before I knew what I was doing, four different varieties were in my online shopping cart, and it wasn't too long before 28 bulbs arrived by courier. I ordered miniature irises in shades of blue and purple (Alida, Blue Note, J.S. Dijt, and Painted Lady).

Four bags of miniature Iris bulbs sitting on a concrete fence.

The next weekend I weeded an area of the back garden, near a very small plastic pond with a waterfall that is solar powered. I pulled out my trusty bulb planter I bought a couple of years ago, and got to work.

My bulb planter

I use my bulb planter for not only flower bulbs, but garlic bulbs also. The planter has a handy measurer on the side, so you know how deep to dig the soil depending on what bulb type you are planting. When you pull the plug of soil out of the ground with the planter, you just pop your bulb of choice into the hole, and then by squeezing the handle, it will release the soil back into the ground. If you are planting large amounts of bulbs, the planter will not only save you time, but also wear and tear on your joints too.

The bulb planter in the ground.

It wasn't long until all my new precious bulbs were in the ground. And now I wait, through all of autumn, and then winter, and hopefully fingers crossed, as we move into spring, my new miniature irises will appear. I can't wait to photograph them in all their glory.

Miniature Iris bulbs
 
Autumn has been such a busy time of year with many harvests and processing of produce happening at the moment. But not only that, I've recently had sinus surgery, followed, by a small complication, and now a sinus infection. I'm hoping to continue recovering from both the surgery, and the infection very soon, so I can get back out into the garden. The weeds are taking over, even though the weather is cooling considerably.
 
Have a wonderful day.
Julie-Ann

Thursday 16 March 2023

My Homegrown Basil Experiment

Hello Friends,

We love eating basil, whether it be fresh in salads or pesto in summer, or dehydrated to add to dishes in winter, so back in the winter of 2022, I added three different types of basil seeds to my Kings seeds order. As I have a PhD in plant biochemistry, I'm always up for experimenting with new plants to see how they grow and what their harvests are like.

The three varieties of basil I chose were, Organic Basil Sweet Genovese, Basil Gustosa, and Basil Lettuce Leaf. Sweet Genovese is the basil everyone usually thinks of when it comes to pesto, and also for eating fresh. This basil tastes fresh and clean, and grows well in a glasshouse, and is the type I've grown for years. Basil Gustosa is also a Sweet Genovese type, but was bred for growing commercially in pots with vigorous growth and good disease resistance. Basil Lettuce Leaf is the strongest growing and most highly prolific of all basil varieties. The leaves are twice as large as normal basil leaves, and the leaves themselves are crinkly.

Basil Seed Packets
I sowed all the basil varieties in mid-September and grew them up in the glasshouse in pots until October when they were dug into the glasshouse soil.
My glasshouse.

The basil plants all grew strong and healthy. There was little difference in growth between the Sweet Genovese and Gustosa basil varieties, and they looked similar. The Basil Lettuce Leaf had leaves much bigger than the other two varieties, were lighter in colour, and they were very crinkly. During its growth the Basil Lettuce Leaf was attacked by caterpillars, where as the Sweet Genovese and Gustosa were not.

Basil Lettuce Leaf
Basil Gustova
It wasn't long before our first basil harvest was picked.
Basil Harvested.

Of the three basil varieties, Sweet Genovese basil was the most like the common basil grown and eaten. It had a sweet taste that wasn't too overpowering. The Gustosa leaves were similar in size to the Sweet Genovese basil, but it's taste was a little more peppery than Sweet Genovese. The Lettuce Leaf basil's leaves were much bigger, and had a slight aniseed taste.

The three varieties of basil leaves next to the seed packets.
We made a batch of pesto by combining all the basil types, and as you can imagine it was delicious. Because of how expensive pine nuts are, we usually use Mother Earth Slightly Salted Cashew Nuts in our pesto. We only buy them when they're on special, and they are salty enough that no extra salt is needed to make the pesto.
The bulk of our basil crop is dehydrated in our dehydrator for later use in the colder months. We bought our Sunbeam FoodLab Dehydrator in August 2022, and have used it nearly every day since then for drying herbs, flowers, fruit, and vegetables. We couldn't live without it now that we own one. We also bought some accessories for it online, so that we have more finer trays for herbs, and also more silicone non-stick sheets for making fruit leather.
Our dehydrator.
Basil on a dehydrator tray

Basil is dried in our dehydrator at 35˚C for a number of hours. It is ready when the leaves snap after they have been cooled to room temperature. After that they are stored in a glass container for 48 hours to check no further water has been released into the container.

When we dried all three varieties of basil in the dehydrator, both Sweet Genovese and Gustosa dried quickly. The Lettuce Leaf basil however, took a long time to dry as its leaves contained much more water than the other two varieties.

Dried basil on a dehydrator tray.

After the basil is dried I ground all the basil varieties together using our Breville Coffee and Spice Grinder. It is designed for grinding all sorts of herbs, spices, and also coffee, and we bought it online when someone was having a sale.

After experimenting with all these basil varieties over the Spring and Summer, I have decided that in future seasons I wish to grow only the Sweet Genovese and Gustosa varieties. Even though they do not have big leaves like the Lettuce Leaf Basil, they still have good plant growth, and are resistant to caterpillar attack. They also dry fast in the dehydrator, which is what we harvest most of our basil for. The mix of the two varieties also brings a good combination in terms of taste, so that's also a bonus.

I am having sinus surgery this Friday (17th March), and will be recovering for a couple of weeks, but have already prepared next weeks blog post for you.

Have a wonderful day,

Julie-Ann

Thursday 16 February 2023

From Seed to Harvest - A tale of this year's tomatoes

Hello friends,

Back in early September 2022, I had a hope as I do every year, that the tomato seedlings I was sowing into seed raising mix would grow strong and healthy, and would provide us with food over the summer, and then into autumn and winter as well.

Every year when the Kings Seeds catalogue arrives, I open it with glee, pouring through the pages, and circling all the many seeds I wish to purchase. My particular favorites are tomatoes, and I love to grow a wide variety for both eating fresh, and in cooking.

A photo of the 2022/2023 Kings Seeds Catalogue
 The tomatoes I chose to sow for the 2022/2023 growing season were:

  • Tomato Juane Flamme (Orange, very tasty)

  • Tomato Andy's Red F1

  • Tomato Grosse Lisse (Beefsteak)

  • Tomato Pomodoro (Cherry)

  • Tomato Thessalonki (Beefsteak)

  • Tomato Andiamo F1(Italian Cooking variety)

  • Tomato Cocktail True Red F1 (Cocktail)

With all the many tomato seeds sown in domed seedling trays they were safely placed in the dining room in the sun, and close to the warmth of our woodburner.

Tomatoes seeds sown into domed trays

In very early October, the seedlings that had come up were transferred into bigger, single pots, and transferred out into my glasshouse so they could continue growing.

Tomato seedlings sitting in their new bigger pots.
We installed my glasshouse when we moved back home to Dunedin in 2019. It's an Allen Christie Regal Glasshouse, it's 2.4 m wide by 3.6 m long, and is zinc-alum coated with automatic vent openers. It really isn't possible to grow plants like tomatoes, cucumbers, basil, capsicums and chilli peppers in Dunedin without a glasshouse, so while we were house hunting we made sure our new home would have space for a glasshouse.

At the end of the first week of October, Dunedin got a snow warning. I wasn't overly optimistic that it would snow, but I didn't have a choice but to transfer all my seedlings that were in the glasshouse, into our spare bedroom for safety. If it did snow, the snow part wasn't what I was worried about, it was the frosts that would follow the snow that would kill all my seedlings off...

Well, it started snowing the next morning. And the snow stuck around all day, with numerous snow showers off and on between sunny spells. I was very grateful for having brought all my precious tomato seedlings inside...

Our front garden covered in snow.


 And when we woke up the next morning, we had 8 cm of snow on the ground.

It was like a winter wonderland, except, it was the middle of spring, and we never usually get snow this late at this time of the year. But at least my tomato seedlings were safe and warm, all tucked up in our spare bedroom.

The snow slowly melted that day, and after a couple of frosts, normal spring weather returned to Dunedin.

My tomato plants were transferred into their final positions in the glasshouse, along with cucumber, basil, and capsicum and chilli plants.

A glasshouse with growing seedlings

It didn't take too much time before my tomato plants reached for the sky thanks to the warmth of the glasshouse, and by the first week of December, the first flowers had appeared.

A tomato plant with a flower on it.

Tomatoes began forming, and ripening, and on Boxing Day, our first ripened tomato (a Juane Flamme) was harvested.

A Juane Flamme tomato

As per my usual tradition, the first tomato is always eaten on some fresh, hot toast, with just a sprinkling of salt on top. It was delicious.

A fresh tomato cut up and put on toast with some salt sprinkled on it.

We're now into peak tomato harvesting season, and while some tomatoes are eaten fresh, most are frozen away to be used later. Later on in the season, some of the frozen tomatoes will be made into Tomato, Capsicum and Lime soup, and also turned into tomato sauce. I'll share both recipes with you when it is time to make them.

Tomato and basil in a trug.

There really is so much to do in the vegetable garden at this time of the year, I really should get into the garden and harvest some more now...

Have a wonderful day,

Julie-Ann